Friday, February 5, 2016

Making a Workbench: Joining the Stretchers, Laying Out and Cutting the Mortise and Tenon Joints

HI!

I have the Box Cleat Clamps done and they worked beautifully; the stretchers are all glued up and just need to be run through the joiner to get them to finished size. The task now is to lay out and cut the mortise (hole in the legs) and the tenons (the pins in the ends of the stretchers.


Yesterday after the stretcher glue-up, I did some fiddling with the layout of the mortise on the leg. I figure that the area of the wood left on the leg and the area of the tenon should be roughly equal so both parts bear the load. Maybe that's not right, but it's a starting point. I took the width of the leg, divided into four sections, and designated the center two sections for the mortise. The center section measured about 3.45cm, or about 1-3/8". I want to try to cut the mortise using a drill press and Forstener bit. The Forstener bit cuts a very nice hole and comes in larger sizes. I can then chisel out the remaining scrap to create the square mortise.

The tenon is easy to cut using a hand saw and chisel to remove waste materials.

Which to cut first - the mortise or the tenon? The Pundits say to cut the mortise first and fit the tenon to it because it's easier to add material to the tenon that to add to the mortise. Some say that it makes no difference. Since my mortise and tenon joint won't be visible, I'll cut the mortise first.

I checked the length of the stretchers after the glu-up, and I noticed the 1) the ends weren't exactly flush, and 2) that not all the glue-ups are the same length. So, I had to trim both ends of all the glued-up stretchers to make them exactly the same length and square and flush. Good argument for doing a rough cut prior to glue-up, since now the stretchers are 19-1/8" instead of 19-1/4" as I had intended. Good learning.

I don't have a 1-3/8" Forstener bit. I do have a 1-1/4" bit, so I'll use that. It just means I have a little more chopping to do with my chisel to get the mortise cleaned out.


Thursday, February 4, 2016

Making a Workbench: Calculating the Stretcher Lengths

HI!

I have the legs cut and labeled, and I need to calculate the overall length of the stretchers (front to back of the bench). The legs and the stretchers will be held together with mortise and tenon joints.

Question .... Do I want a "tool tray" at the rear of the top of the bench? A tool tray is basically a small open, fixed tray that can hold small parts, sawdust, etc. while working. I can make one by extending the undercarriage of the workbench and adding a tray on top of the undercarriage. Some workbenches have a tool tray in the center of the bench; some have on at the back of the bench; and many have no tool tray at all. Pros of a tray - you don't have stuff laying all over the workbench while work is in progress. Cons are that building the undercarriage larger that the top may make the workbench unstable; the strongest part of the workbench is directly over a leg; stuff collects in the tray and gets cleaned out infrequently. I don't think I need a tray ..... and not having one will make me clean up more often and stay organized.

Here are the working dimensions I'll use to calculate the length of the stretcher ...... Leg 1 is 2-3/4" wide and 3-1/16" thick. The top is 22-3/8" wide. T-1-I is the leg piece that will have the tenon in it, and it is (calculated) 1-17/32" thick. I'm not skilled, and I don't usually deal with 1/32" increments, so I'll stay with 1/16" increments and use my joiner to shave the final assembly as needed.

I decided to inset the legs 2" from the ends of the top, but I can't inset the legs 2" along the front because the rail needs to be flush with the top face for work holding. I can inset it slightly at the rear of the bench if I need to. So, my working dimensions are going to be ....

Width of the top = 22-3/8" wide
Thickness of a leg = 3-1/16"
Distance between inside pieces of legs 1 & 2 = 22-3/8" - (3-1/16" x 2) = 16-1/4"

Stretchers are then 16.25" + 1.5" + 1.5" = 19.25"

Please, check my math. Dad always said "Measure twice and cut once!" I always lived by "I cut it off twice and it's still too short!"

CHEERS!

Phil


Making a Workbench: Mortise and Tenon Joint

HI!

The legs of the workbench and the upper stretcher are connected with a mortise and tenon joint. The leg is two-piece, and the tenon on the stretcher goes completely through the inside piece of the leg but doesn't go into the outside piece of the leg. When assembled, the end of the tenon isn't visible.

Here's a picture of the mortise and tenon joint. The brown colored part is the leg of the workbench and the blue colored part is the stretcher.

The top of the stretcher (blue) has to be flush with the top of the leg (brown) so that the top  of the workbench will rest on both.

I don't think there's a hard and fast rule about the thickness of the shoulders of the tenon. I'm going to make the tenon square with the center placed so that the tops are flush.

From a technique perspective, I'll drill a hole with a Forstener bit on a drill press, and then clean the mortise out with a chisel. I have a nice tenon saw, so I'll cut the tenon with that rather than using the radial arm saw or the table saw, even though both of those saws would be quicker (for me).

Measurements for the stretcher ...... tenon length 1-1/2", stretcher length from inside leg to inside leg 19-1/4", total length of stretcher 22-1/4".

The good thing about this joint is that it's quite strong and nearly invisible.

CHEERS!

Phil

Making a Workbench: Box Cleat Clamps

HI!

So, now I have both the leg pieces and the stretcher pieces cut. I can't glue up the legs yet; I still have to cut the dovetails before assembly. I can glue up the stretchers though. I need the completed assembly before I can cut he tenons that will fit into the mortises in the legs.

Thanks to Ken for making sure I always mark my parts so I don't have to guess which one goes where!

In order to glue up the ~two x fours pieces for the stretchers, I'll need a way to clamp the two boards together after the glue is applied. I don't have enough clamps (no one ever does) so I did some research ...... how did They do it in the past when there were no commercially produced clamps? I ran across a clamping system call "Box Cleat Clamps."

Modern Box Cleat Clamps are made out of 2 x 4 stock, and consist of a box of 2 x 4s and a pair of shims - sort of wedges - that apply pressure from the Box Cleat Clamp to the glued up boards. Construction is simple, and the clamps can be used over and over again. Here's a picture of three Box Cleat Clamps holding a glue up of two x fours using the wedges. I'm going to go ahead and build enough of these frames to glue up the stretchers later today.

http://www.popularwoodworking.com/woodworking-blogs/editors-blog/box-clever-use-box-cleats

I'll need about 24 feet of 2 x 4 to make 6 Box Cleat Clamps - enough to do all of the glue ups for the stretchers at one time (3 cleats per glue up, two stretchers per frame).

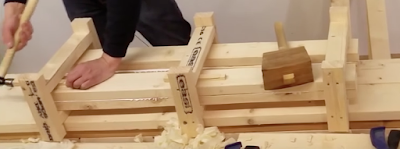
I put the Box Cleat Clamps together, nails and glue, and placed the stretchers into them. After wedging them in I straightened the ends flush and flushed the sides so I don't have to do much work planing them after they dry.

I am amazed at how much clamping pressure you can get with this method. Glue comes squeezing out along all of the joints!
I'll continue with the Box Cleat Clamps, making another pair. The legs are longer than the stretchers by twice so I'll need to use three instead of two.

CHEERS!

Phil


Wednesday, February 3, 2016

Making a Workbench: Cutting the Legs

HI!

I started with a 2 x 12 CVG Douglas Fir board. CVG simply means no knots or imperfections. I calculated the maximum width of four boards that I could get from a 11-1/4" wide board assuming a 1/8" saw kerf.

I tried to cross cut the board at 32-5/8" with my radial arm saw, but the board splintered on one side, so I used my Japanese draw cut saw to make the crosscut. The cuts turned out nice.

I then ripped the 11-1/4" board to 4 each 6.9 cm widths (that requires 3 rip cuts). I find it a lot easier to do the math if I use metric measurements. When I rip cut the last board, the trim was less than the width of the saw blade ..... whew!, cut that one close.


The unfinished legs look really good. I need to mark the top of each piece with the position it will be in after laminating. Marking is important because the joinery gets cut before assembly and there's no room for error. The marking schema will be "T" for top, "1" for leg number 1, "I" or "O" for inside or outside. So T-1-I would be the inside piece of the leg on the left front corner of the workbench. In addition, I'll add an arrow pointing to the mating faces of the leg. Legs are numbered from front left, clockwise to leg 4 at the front right corner.

Next step is to calculate the length of the upper and lower stretchers, including the length of the tenons on each end and then mark and cut the mortise and tenon joints that attach the stretchers to the legs and join the undercarriage to the underside of the top.

CHEERS!

Phil


Making a Workbench: Laying out the Workbench Base

HI!

I decided that I've probably spent enough time on the top for now. I'll start on the frame.

I wanted to plan out the steps I need to take and to get an idea of what more lumber I'll need. Here's the sketch I drew of the undercarriage of the workbench. 

Here are the steps I need to take (hopefully all of them, and hopefully they are in order):

1. Decide on the height of the workbench, thus determining the length of the legs. Finish height is 37-1/2" since I'm still 6'-5" tall.  
2. The undercarriage will be flush with the front of the top, and the legs will be inset from the ends by 2"
3. The leg pieces have to be cut first because there's some through wedged half-lap dovetails in the joinery. I calculated the maximum width of leg to be 6.9 cm based on taking 4 rip cuts from a 2 x 12 CVG Douglas Fir board. 

4. Size and cut the two-piece stretchers (going from front to rear of top). There are 4 stretchers, so I'll need 8 pieces laminated together. Their length has to include the tenons for the mortise and tenon joints. The tenons go through ONLY the inside piece of the leg and the tenons aren't seen once the legs are glued together. 
5. Choose the vise. I chose a Jorgensen quick release 10" face x 12" opening vise. At some point, I'll have to face the jaws, probably with hardwood. I've decided not to inset the vise in the underneath of the top. The mounting hardware needs a 3-7/8" x 12" clear space for installation. 
6. The stretchers aren't affected by the placement of the vise, but the rails are. The upper rails are flush with the front face of the top and the bottom rails are inset using a hidden half-lap wedge dovetail. The top rails have to be set down far enough from the underside of the top to allow the installation of the vise. 
7. Cut the joinery ...... mortise and tenons for the stretchers and half-lap dovetails for the rails. 
8. I'm constructing the undercarriage with enough room in it to add a center support and build drawers and / or shelving underneath the bench. Not sure yet if I want to do that, so I'll ensure I can if I, at some point, want to add them. 
9. Mount the vise. 
10. Assemble the undercarriage.
11. Attach the top to the undercarriage. 
12. Enjoy it! 

Sounds easy! CHEERS!

Phil

Monday, February 1, 2016

Making a Workbench: Experimenting with Finishes

Hi!

I'm at the stage where I can start to experiment with finishes. For the top of the workbench I want a finish that is pretty rugged and hardens up, but is not slippery. My go-to finish right now is Tung Oil, a finish that penetrates voids and dries a little on the glossy side. Since I have mostly done benches and furniture, I've only worried about the look of the finish, and haven't spent much time assessing it's slipperiness.

 Here's a picture of the top with a partial coat of Tung Oil ...... Be sure to wipe off the excess 5 minutes after application or you will have a sticky mess on your hands! The oil goes down into the cracks and solidifies, making it unlikely that dust and dirt will penetrate the top, and it should also stop the cracking process from getting worse.

I put on a coat, wipe it, and sand it off, then repeat the process 3 times, as recommended on the can. More than 3 coats and the oil won't penetrate.

I'm going to sand off the oil completely each application because I don't want a glossy finish. As a last step, I'll probably put on a coat of water based acrylic, which dries to a clear, satin, hard coat that can be repaired pretty easily.

I tried some Tung Oil over the crack filler putty and it turned out badly. The putty can says it'll take stain readily, but it won't take oil; it stays a putty color rather than going to the rich brown the oil causes on the bare wood. So, no or only a small amount of putty for the top. Probably only crack fill on the knots.

CHEERS!

Phil

Friday, January 29, 2016

Making a Workbench: Applying the Crack Filler

HI!

So, I'm not sure I want the top of the workbench riddled with cracks. The GluLam beam, on both sides, has surface cracks running from one end to the other, and especially on the bottom there are a number of knots. All the cracks and the knots are depressed. So, I'm going to experiment on the bottom, applying a coat of the same crack filler putty that floor installers use. It says on the can to trowel it all over, let dry, and light sanding will remove all of the material that's not filling a crack.

So here's the bottom face of the top with two patches installed, planed off smooth but not sanded. It looks pretty good, and I probably would have no issues with using it just the way it stands. The patches are made of Poplar and of Purple Heart; both are hardwoods with very close grain, so I doubt if they will require any crack filler putty.


This is the wood filler I picked to fill the cracks. Turns out that the stuff in the tube is too dry to squeeze out easily and there's not enough in the tube anyway, so I didn't use it.

This stuff is runny, so I poured it on, and used a trowel to smooth it out. I've tried sanding this kind of material before and it turns out to pretty difficult. I'll let it dry and then try scraping it off before doing any sanding.


Here's the coated table ....... sort of dry scale all over it.

We'll see how this works out!

CHEERS!

Phil

UPDATE: 

What a mess. The stuff dries to a consistency very close to concrete. It's almost impossible to scrape off so I used my plane ...... it did come off, but there are many, many more cracks and depressions thatn I thought there was. The dried putty in the depressions looks very different from the Douglas Fir, and the depressions that filled up are highlighted by the creme colored putty. 

I could probably sand the stuff off with 100 grit, but It's cold outside and I'm inside and don't want to make a mess that will require a couple of days to clean up, so ...... I'll wait. More later! Suggestions??

CHEERS!

Phil

Wednesday, January 27, 2016

Making a Workbench: Patching the Cracks

HI!

I completed the work to flatten the top and bottom of the bench by hand planing and now need to address the cracks that run from one surface to the other. They may not create any problems, but I don't want to have any in the future, so I'll do the correction now.

There are quite a few cracks in the bottom near the one that goes all the way through, so I'll use a piece of Poplar large enough to cover them with one patch. Here the patch has been cut and laid over the area to be covered, and I mark around the patch with a marking knife to get a good edge definition. I'll remove all the material inside the outline of the patch, put the patch down into the hole I've created, glue it in, let it set and then plane off the part sticking up.


 Here's the hole for the patch with much of the inside material removed. You can see the mark of the knife where I still have to remove more material. I'll be very careful along the edges, using a chisel to remove the material along the outline of the patch.


And then I apply glue to the removal area, place the patch, pound it into place, and clamp it for 24 hours before planing off the excess and making the patch flush with the top.

Eeeeezy Peeeezy, huh? In concept, yes .........


Here's the final patch all planed off. The patch grain runs cross-grain to the grain of the bench top to keep the top from splitting more than it already has. I'm confident it's strong, but I don't think the patch is "pretty." I'll do one that's a little different (and more attractive) next time.

This is the bottom of the bench top and it won't be seen, so it's OK to do a lot of experimentation with techniques on this surface prior to trying it on the part that will be seen!

The dark part below the patch is a half-circle cut out of the top from top to bottom. I suspect it was a hole drilled in the original glulam beam, for what reason, I can't tell.

Deb remembers seeing the people who installed our hickory flooring use a neutral putty mixed with water to fill the cracks in the flooring; she suggests that I try that on the bench top, so I'll be looking for the putty and some water in the next few days.


CHEERS!

Phil


Saturday, January 23, 2016

Making a Workbench: The Other Side Gets Cleaned Up

HI!

Same process as just described gets done to the other side; another 3 hours of hacking on the underneath side with planes. Here's the "finished" result of the rough planing:

This side has a few more problems than the other.
First, the left edge has a crack that runs the full depth of the glu-lam. In order to make the bench stable, I'll have to stop the crack, probably with a butterfly.

Second, the wood seems to have dried out more on this side than the other; the grain is raised and there are splits in almost all of the lengthwise boards. I'll want to fill those to stabilize the wood and to keep more cracks from forming through to the top. I might be able to close up the splits by adding moisture in the form of tung oil; I'll have to try that, experimenting on the underneath side.

The left edge has a bunch of missing pieces; the whole edge has several dings, gouges, and missing wood, so maybe I'll want to fill those in, creating a new edge.

I'm satisfied that I can make this both structurally sound and "pretty." Anything I can do on this side to perfect my techniques will transfer to the other side - the side everyone will see.
CHEERS!

Phil

Making a Workbench: Planing the Surfaces

HI!

First step is, I think, cleaning up the surfaces so I can figure out what I've got. I'll choose the "best" surface for the top, and the other side will be the underneath of the workbench surface. I won't have to do as much work on the underneath as I will on the top, but still, I'll have to clean it and flatten it so that I can attach the workholding devices to a solid surface.

This is the planed "top" of the workbench. I don't know yet that it will be the top because I haven't had a chance to check the other surface yet, but it looks pretty good once cleaned up. There's one gouge out of the surface that will have to be fixed, and a couple of stains that I might take out, but overall pretty solid with only one full-thickness crack in it.

Planing by hand isn't complicated; using the largest plane I have (18"), and working from one side of the surface, I plane across the grain from one end to the other and back. Each stroke is full-width and overlaps the prior pass by about 1/2. The size of the sole plate of the plane ensures that I knock the high spots off pretty evenly across the surface. The cross-grain planing is repeated from the other side of the surface.

Then, using the same large sole plate plane, I plane from one side end-to-end in a herringbone pattern. This takes out some of the cross-grain roughness. The patina is beginning to come off. I repeat the herringbone from the other side.

Then, using a smaller plane, I plane along the long direction to start smoothing. All in all, about three hours of hacking on the top gets me to a place where it's flat and reasonably clean!

CHEERS!

Phil


Making a Workbench: Found the Top for the Bench

HI!

The basic plan for our workbench calls for a laminate top made out of 2 x 4 boards laid on edge and glued face-to-face. If the total width of the top is around 24" (in two separate sections), then that requires 2 sections of six boards laminated together.

In order to laminate boards face-to-face, I'd need to plane the surfaces, glue them up, clamp them at least overnight, the plane them again to a final flat surface. And, I probably can't glue all six boards together at one time; maybe I could glue up 3 of them at one time, then repeat the glue-up with another 3 board section to get one six board section. Complicated.

I have a relationship CS Woods, a hardwoods supplier in the Denver area, and so I thought I'd search their inventory for un-sanded boards that I could plane flat and to final size. I spent about an hour poking around, looking at the several species of hardwoods they have in stock. None are sanded any side, and they are random thicknesses and lengths - all would require a lot of preparation before they could be used to fabricate the top.

At the back corner of the warehouse, I spotted what looked like a piece of a glu-lam beam. This beam was a roof support beam in a warehouse in Denver and had been in service for a number of years.

It's 5" thick, 22-1/2" wide and ~60" long - perfect size for the top of my workbench. It's actually half of a beam - CS Woods cut the one they have in half for me.

It's old, been dinged a few times, has a patina of dirt, and is dried out on one side, so it'll take a bit of work to put it in usable shape. Also, it's not hardwood like most custom workbenches use; it's made of Douglas Fir. I checked through the lierature, and most professional woodworkers, ones who teach classes, don't care what materials are used for the bench, so probably Douglas Fir is OK. Using this as a top for the workbench fills the need for something heavy (165 pounds), but I'll end up designing the rest of the workbench around the top.

Best thing about it - I like recycled building materials, especially those with a known history!

More later! CHEERS!

Phil


Friday, January 22, 2016

Making a Workbench: The Basic Design

HI!

I ended up needing to make a new workbench for myself. I think it's an ambitious project and incorporates joinery that I haven't used before. Oh, bye the way, I'm trying to become a woodworker - a task that involves learning many, many brand new skills. In the past I've been kinda ham-handed as a woodworker - mostly a demolition type guy. Now I'm trying to step up my game. And, I'm trying to use a higher quality wood (better grades and species that the Orange Box store "whitewood"), and to use primarily hand tools. I've always been a believer that if you can do it by hand, then you UNDERSTAND what you are doing so I'm going to use as many hand tools as I can - minimizing the use of power tools.

The purpose of this blog is to entertain you and to document the process I'm going through. Please feel  free to offer any comments and suggestions about how to increase my skills.

The basic design .......

The basic idea is to create a top, create a frame for the top to sit on, add work holding devices (mostly dogs or vises) and finish all of it. Sounds really simple.

First step is to make a top. Usually, home built tops are either plywood or laminations of 2 x 4 on edge. This design calls for two sections of 2 x 4 laminates, each 6 boards, for a total width of each top section of 12" or so.

The two sections are separated on the frame by a row of boxes where the craftsman (maybe ME eventually, LOL), can put shavings, sawdust, tools, etc. without them getting in the way of work. I have a lot of thinking to do about the top, so I'll be back later with the explanation of the frame for the top.

Until then ....... CHEERS!!

Phil