So, now I have both the leg pieces and the stretcher pieces cut. I can't glue up the legs yet; I still have to cut the dovetails before assembly. I can glue up the stretchers though. I need the completed assembly before I can cut he tenons that will fit into the mortises in the legs.
Thanks to Ken for making sure I always mark my parts so I don't have to guess which one goes where!
In order to glue up the ~two x fours pieces for the stretchers, I'll need a way to clamp the two boards together after the glue is applied. I don't have enough clamps (no one ever does) so I did some research ...... how did They do it in the past when there were no commercially produced clamps? I ran across a clamping system call "Box Cleat Clamps."
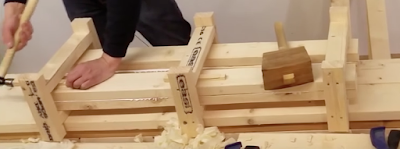
Modern Box Cleat Clamps are made out of 2 x 4 stock, and consist of a box of 2 x 4s and a pair of shims - sort of wedges - that apply pressure from the Box Cleat Clamp to the glued up boards. Construction is simple, and the clamps can be used over and over again. Here's a picture of three Box Cleat Clamps holding a glue up of two x fours using the wedges. I'm going to go ahead and build enough of these frames to glue up the stretchers later today.
http://www.popularwoodworking.com/woodworking-blogs/editors-blog/box-clever-use-box-cleats
 I'll need about 24 feet of 2 x 4 to make 6 Box Cleat Clamps - enough to do all of the glue ups for the stretchers at one time (3 cleats per glue up, two stretchers per frame).
I put the Box Cleat Clamps together, nails and glue, and placed the stretchers into them. After wedging them in I straightened the ends flush and flushed the sides so I don't have to do much work planing them after they dry.
I am amazed at how much clamping pressure you can get with this method. Glue comes squeezing out along all of the joints!
I'll continue with the Box Cleat Clamps, making another pair. The legs are longer than the stretchers by twice so I'll need to use three instead of two.
CHEERS!
Phil


No comments:
Post a Comment